
Cleaning mould from your bathroom tiles is never an easy task and we're all guilty of overlooking it, even though we use our bathroom daily. Trouble is, the more we ignore the build up of mould and mildew, the more of a problem it becomes!
The easiest way to prevent mould in your bathroom is by following a proper bathroom cleaning guide and also by understanding how to reduce humidity in your bathroom.
But, if you've noticed those pesky black spores building up or your grout becoming discoloured, then here's a quick guide on how you can both remove it with ease and prevent it from returning in the future.
But first, what is mould?
Mould is a type of fungi which is usually black in colour. Mould will grow when there is moisture present in an environment with little or no sunlight. And, as mould grows best in damp, poorly ventilated areas, it quite simply thrives in bathrooms.
Plus, once mould takes hold, it spreads incredibly quickly and can still remain present without any visible signs. Unfortunately, prolonged exposure to mould can cause health problems so it's important to remove it before it has a chance to spread.
Mould can grow on any number of surfaces in your bathroom. Most commonly found around your bath or shower enclosure, but also in those more hidden areas or places you might not think to check. Always look at the join of your sink or vanity unit, the edge of your shower tray or around your toilet.
What is mildew?
Mildew is a more specific kind of mould that typically comes in two forms.
Downy mildew usually appears as yellowish spots that quickly turn to brown, and powdery mildew which appears as white powder that slowly turns to a dark black colour.
Both types of growth occur when the area contains a high level of moisture and little ventilation.
How to clean mould from bathroom tiles
There are a number of ways, both natural and chemical, to remove mould and mildew from your bathroom. As mould is a living organism, the key is to not just remove the visible signs of the build up, but to kill it completely and stop it returning in the future.
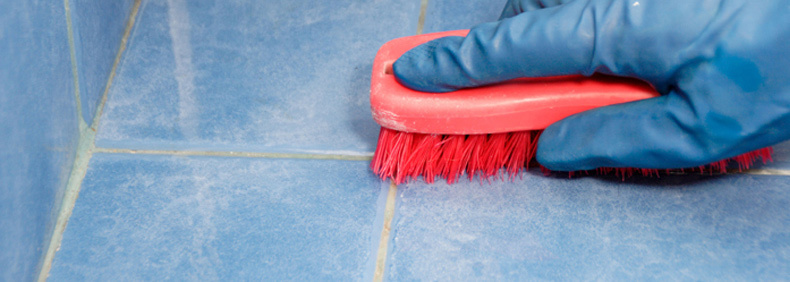
Here's some of the easiest ways to remove mould. Always wear cleaning gloves to protect your hands.
1. Vinegar
The most important thing to note when using vinegar to remove mould is to always use a white vinegar that is recommended for cleaning, these can usually be found at a supermarket or supplies store. Plus, attempt to clean the mould without diluting the solution with water for maximum results.
- Spray the vinegar on the affected surfaces.
- Leave the vinegar for an hour. You might want to ventilate the room by opening a window where possible.
- Dampen a micro fibre cloth with warm water and wipe the surface clean.
- Finally, dry with a towel to prevent mould regrowth.
2. Borax
Borax has a white powdery consistency and can be found in the cleaning aisle of your local shop or supermarket. It's usually quite inexpensive compared to other cleaning alternatives.
- Mix 1 mug full of Borax with 4 litres of warm water.
- Work the solution into the affected areas with a brush or cleaning pad.
- Wipe over the solution with a clean, damp cloth.
- Allow the areas to dry naturally.
3. Bleach & baking soda
Using bleach is one of the quickest ways to treat small areas of mould on your grout, tiles or walls. You should always wear gloves and a mask when working with bleach for protection.
- Mix 1 part bleach to 2 parts water & transfer to a spray bottle. For more stubborn areas you can apply the bleach neat and brush using an old toothbrush.
- Spray the solution onto the affected areas and allow to dry.
- Give it another spray and scrub with a soft brush.
- Rinse the area & repeat until mould is removed.

4. Hydrogen peroxide
Hydrogen peroxide can be bought in various degrees of strength. For cleaning mould from the bathroom, it’s best to use a fairly mild 3% hydrogen peroxide solution. You will be able to purchase this from most DIY suppliers and some high street supermarkets. The cleaning effectiveness of hydrogen peroxide will diminish if it is exposed to direct light so make sure you decant it into a dark spray bottle. If you want to increase the effectiveness of the hydrogen peroxide solution, you can add a little vinegar into the spray bottle.
- Spray the solution directly onto the affected areas.
- Leave to treat for 2-3 hours.
- Keep the room ventilated whilst cleaning.
- Wipe surfaces clean.
5. Specialised mould sprays
If you don’t want to make your own cleaning solutions at home, there are plenty of bathroom cleaning products with specialised mould removal properties. Always be sure to research the effectiveness of each product and read customer reviews to make sure you get the right product for your needs. Try to steer away from high strength cleaners such as ‘Cilit Bang’ as these have been known to eat away at grout and cause damage to bathroom fittings and surfaces.
Grout & caulking
Grout and caulking around tiles or the edge of your bath can be a common place for mould and mildew to build up. If mould has worked its way into the caulking or grout and stained it permanently, there’s a strong chance that the methods mentioned above aren’t going to be extreme enough to tackle it. If you’ve tried everything and the mould just isn’t budging, it might be time to remove and replace your grout or caulking.
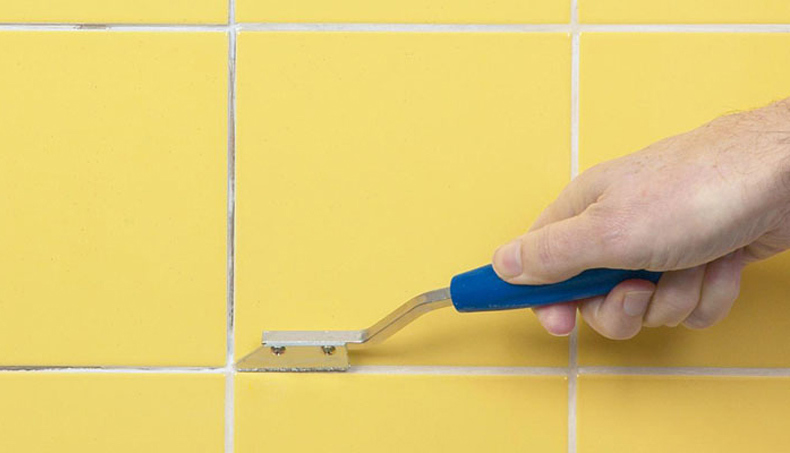
How to clean mould from bathroom grout
To remove grout between your bathroom tiles, you will need a grout removal tool, old paint brush or sponge and a diluted bleach solution. Then you will need replacement grout, grouting squeegee and gloves.
Step 1: Prepare the surfaces
If you haven’t already, try using a toothbrush to work in a strong solution of bleach and water or bleach and baking soda on the grout to bring back the whiteness before resorting to removing it completely. If this hasn’t worked, it's time to begin removing in order to replace with fresh grout. It's a good idea to cover your bath or basin plug hole with and old cloth or large piece of material. This will stop any pieces of grout falling down the drain and causing a blockage.
Step 2: Scrape away the old grout
Using the grout remover tool, pull the tungsten tipped blade across the joint lines to start raking out the grout. It’s important that you work at a small area at a time so ensure that every last mould spore is removed. This will ensure that the mould does not return in future. Be careful not to push too hard on the removal tool as there’s always a chance you could slip and cause permanent damage to your tiles. Be prepared for this to take time as you need to ensure you go deep enough to remove all of the old grout from between the tiles.
Step 3: Clean the joint lines
To make absolutely sure that there is no remaining mould within the joints, use an old paintbrush and some diluted bleach solution to clean the grout lines. This will also make re-grouting the joint lines much easier when it comes to step 4, given that the space you’re working with will be smooth and clean.
Step 4: Apply new grout to the tiles
Before applying new grout, make sure you’re using the correct grout for your tiles and the location of the tiles. A tiling or DIY store will be able to offer advice on the best grout to use. Using your grouting squeegee, re-grout the tiles and ensure that any remaining residue on the tiles is cleaned off properly before letting it dry. Removing dried grout from tile facings is an incredibly difficult task so it’s a good idea to take preventative measures during the re-grouting process.
Sometimes, mould can be a sign that there are concealed problems within the bathroom walls or within the bathroom itself. Burst or leaking pipework is a common example of a problem that can go unnoticed for long periods of time, leading to long term damp problems that can allow mould to build up time and time again.
If, after removing mould multiple times, the problem still persists, it is suggested that you hire a specialised mould remediation expert who can diagnose and fix more complicated and serious mould issues within the home.
If you're looking for more articles like this, have a read of our Bathroom Tile Guide, The Cost of Tiling a Bathroom and How to Prevent and Get Rid of Mould.


