
Whether you’re looking to install a traditional pedestal or a minimalist wall mounted design, the humble bathroom basin can make a real style statement within a bathroom.
This being said, renovating your bathroom means removing that old, tired basin before you bring in the new and this can be a tough task. If you feel confident in doing so, then the following guide will help you along the way but if not, always assign the job to a reputable plumber or bathroom fitter.
To help you along the way, we’ve compiled a simple step-by-step guide to how to fit a bathroom sink:
So to start, you will need the following:
• Screwdriver
• Adjustable wrench
• Plumbers tape (PFTE tape)
• Hacksaw or tube cutter
• Spirit level
• Tape measure
• Drill
• Stud detector
• Adjustable spanners
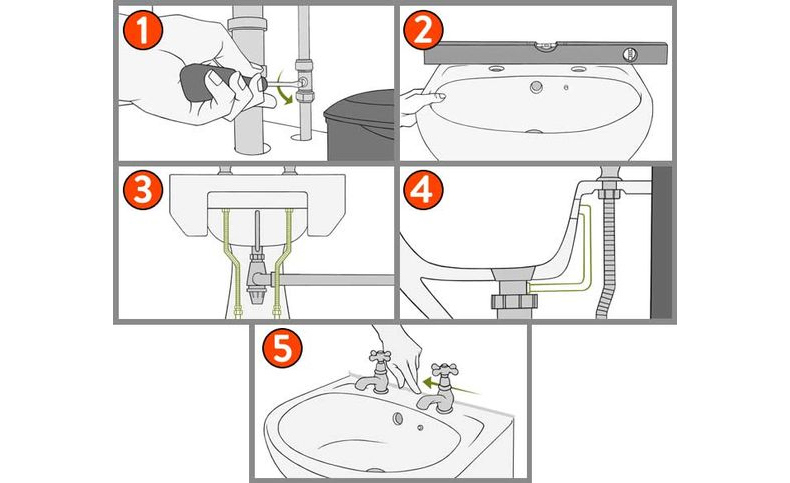
Step 1: Removing the old sink
First and foremost, you’ll need to turn off the main water supply before you begin any work. Depending on the water system you’re using, you will be able to do this by using the isolator valves for the hot and cold feeds beneath the sink or from the cold water supply at the main stopcock. After you have done this, remove the basin taps from the old basin (There’s a handy guide for doing so if you click here) and then remove the old sink by unscrewing the waste or bottle trap from the underside of the basin and removing any wall fixings or screws.
Step 2: Aligning the sink to the wall
Next, align the new sink to the wall using a spirit level to make absolutely sure that it is straight. Once you’ve done this, use a pencil to mark where the sink should sit against the wall and mark where the wall fixings should go underneath the basin.
Step 3: Checking the connections to the sink
If all goes well, you might be able to connect the main water supply feeds and waste back into the new sink and taps and it might be a straightforward job. If not, or if you are fitting completely new taps, fit the necessary flexible tap connector pipes and waste pipe parts to make the connections. Use any washers and screws needed to ensure there is an absolutely water tight seal around any new taps. Ensure that you fit as many parts to the new sink as absolutely possible (taps, wastes etc.) before fitting to the worktop or wall so that you only have a small task to fit the new connections afterwards.
Step 4: Connecting the pipework
If you’re fitting the sink against a wall, you’ll need to first screw it in so it’s firmly in place. You can do this using special fixings, sometimes called Fischer fixings, that usually come with the basin. After this has been done, connect the overflow and waste pipes using all the parts supplied and connect any other pipework necessary.
Step 5: Sealing the sink
Seal around the basin with waterproof silicone sealant in one continuous line to create a seamless finish. Once done, check any remaining pipework for kinks or bends and ensure these are rectified before then turning the water back on.
Tips for fitting a bathroom sink
• If cutting pipework, make sure you wrap a bit of masking tape around the pipe first in the location that you want to cut. This will ensure that you have a smooth, straight cut through the pipe and will help stop any accidents
• If you are installing a basin within a worktop, the gap for the previous basin may have been a different size. Recessed basins usually come with a template for cutting so make sure you follow this using a jigsaw to enlarge the space
Please note that this guide is a rough step by step guide. Fitting some basins will require a slightly different method so if you don’t feel confident with the removal, make sure that you hire a plumbing professional to carry out the work for you.


