
Purchasing a brand new bathroom tap (or even pair of bathroom taps) can breathe new life into a tired bathroom. Whether you’re going for something traditional, such as a pair of crosshead basin taps, or you’re going for a sleek minimalist look with a waterfall mono basin mixer, it’s a reasonably simple task to replace your previous bathroom tap.
To make things that little bit simpler for you, we’ve compiled a quick and handy guide to replacing your old bathroom taps.
So to start, you will need the following:
• Screwdriver
• PFTE tap
• An adjustable wrench
• Basin spanner
• Junior hacksaw
• Tap connector pipe(s)
• Pipe cutting tool
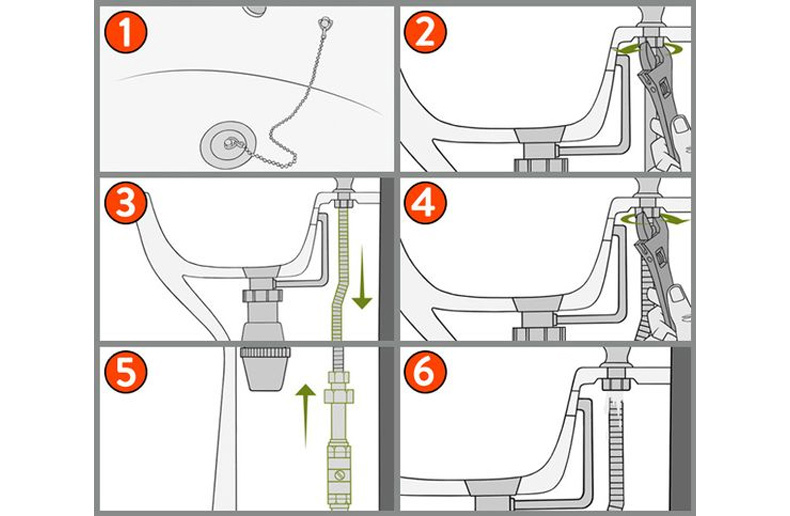
1. Loosening the tap
First and foremost, you’ll need to shut off the main water supply to the tap. After this has been done, it’s always best to put the plug in the basin to prevent any bolts and fixings falling down the drain and causing any further issues. Sometimes it’s a good idea to use a knife to remove any excess sealant around the base of the tap to make it that little bit easier to remove but make sure you’re careful not to damage the finish of the basin when doing so.
2. Unscrewing the nut beneath the basin
You’ll then need to unscrew the nut that tightens the tap to the basin. This is located on the underside of the basin itself. This can sometimes be pretty tricky when you don’t have a lot of space to play with so you should be using a cranked basin spanner to loosen the nut. If you’re removing a very old tap, the connection may well have become rusty or corroded. If this is the case, use a junior hacksaw to cut through the nut or the stem of the tap.
3. Checking the tap connections
Unless the new tap that you’ve purchased will fit straight onto the existing pipe, you will need to use a tap connector. Most new basin and bath taps will come with flexible tails (usually a corrugated or braided pipe with a threaded tap connector at one end and a compression fitting on the other) to make the installation a breeze. If necessary, you can use a pipe cutting tool to trim the end of the pipe, ready for the compression fitting.
4. Fitting connections to the new tap
Hand-screw the tap connector the end of your new tap and then tighten gently with an adjustable wrench. Hold the main body of the tap as steady as possible whilst you’re doing this to prevent any damage to the fitting or to the baseplate that the tap sits upon.
5. Fitting the connector to the pipe
Now that your pipework is ready for fitting, connect the pipe to the end of the flexible tails with a compression fitting. Sometimes, before doing this, a lot of plumbers opt for placing a bit of plumbers tape (PTFE tape) around the connection to create a waterproof seal. You can usually find this at all local plumbers merchants or DIY stores. Push the cap nut, followed by one of the olives (the internal ring that is part of the tap compression fitting). Now push firmly on the joint so that the end of the pipe hits the stop inside the joint.
6. Tightening the nut beneath the basin
To hold everything into place, you’ll need to hand tighten the main nut against the fitting. Once its firmly in place, use a spanner to hold the fitting and turn the nut by a single complete turn with the second spanner. Return as many times as necessary to hold the entire fitting comfortably in place. Once this is done, recheck all of the fittings and joints. Afterwards, turn on the water supply and check for any drips or leaks. If there are any, then you’ll just need to retighten any applicable joints.
Please note that this guide is a rough step by step guide. Installing some taps will require a slightly different method so if you don’t feel confident with the installation, make sure that you hire a plumbing professional to carry out the work for you.


