
Sealing your basin correctly is the best way of creating a flawless finish in your bathroom and it doesn’t take a great deal of experience or DIY knowledge, just a steady hand and some time.
After all, you don’t want to spend all that money on a gleaming new bathroom suite, only to have the final finish ruined by sloppy workmanship.
To ensure this does not happen to you, we have compiled this handy guide to sealing around a basin correctly:
So to start, you will need the following:
• Bathroom sealant
• Mastic gun
• Crafting knife
• White spirit
• Latex gloves
• Disposable cloth(s)
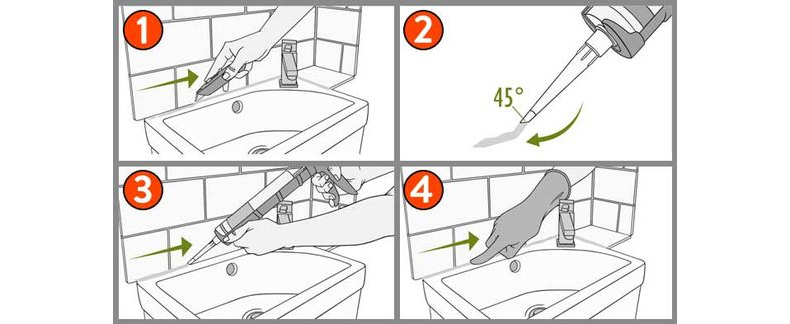
1. Remove the old sealant
Use a craft knife with a freshly sharpened blade to slice away the old sealant around the basin. Sometimes this can be quite a fiddly process so make sure you’re as careful as possible when doing so to protect the basin finish and the surrounding tiles if there are any. Once you’ve got rid of the old sealant, use a cloth and some white spirit to clean away any remaining grease and dirt that remain around the edges of the basin. You may want to leave this for a few minutes afterwards to make sure the surfaces are as dry as possible before applying the new sealant.
2. Prepare and test the sealant
First and foremost, you’ll need the cut off the tip of the sealant nozzle at an angle of 45 degrees, around 20mm from the end. Unscrew the nozzle and trim off the tube seal. Screw the nozzle back onto the sealant and fit the tube into a mastic gun. Sometimes there might be trapped air within the sealant bottle so test it out to make sure it flows out in a smooth bead.
3. Apply the sealant around the basin
Before starting this process, you might want to make a border around the edges of the basin with some masking tape. This will help ensure a perfect finish and prevent mess. Starting from one of the corners of the basin, gently press the trigger of the mastic gun and form a ‘bead’ around the lip of the basin with a smooth, continuous movement. This will ensure that you have a smooth and tidy sealant line across the basins edge. Once you’ve reached the end of the basin, quickly pull the gun away and rest it against some newspaper to catch any excess sealant that is still coming out of the gun.
4. Smooth over the sealant
Run your finger or the blunt end of a pencil across the edges in a smooth action to make sure that the edges of the sealant blend with the basin edges. If doing this with your hands, make sure that you are wearing latex gloves to protect your hand. This will ensure that there is water tight and perfect finish. After you have done this, do not touch the sealant until it is completely dry and carefully wash away any excess or spilt sealant away from other parts of the basin.
Sealant tips
• Depending on the look you’re trying to achieve, there are many alternative sealants on the market such as clear, black and coloured sealants. Ensure that the sealant you choose contains mould inhibitors to reduce any chances of mould formation once you have sealed your basin or bath
• Getting a smooth technique for sealing around a basin or bath can be tricky. If you’re not feeling confident then practice sealing around the edges of a cardboard box or CD case beforehand
• Once you’ve broken the seal on a sealant tube, they usually last up to a week. You can ensure that you make your sealant last as long as possible my placing a match stick in the end
• When sealing around the edges of a bath, ensure the bath is filled up completely beforehand. This will lower the bath slightly due to the weight of the water. Seal around the bath whilst it contains the water and then empty it. Once emptied, the bath edges will push up against the sealant, forming a water tight joint around the entirety of the bath
Please note that this guide is a rough step by step guide. Sealing certain basins will require a slightly different method so if you don’t feel confident with the process, make sure that you hire a DIY professional to carry out the work for you.


