Whether you’re looking to make things when painting a room, or if you’re just looking to install a brand new radiator, you’ll first need to remove the old one. This can be a really quite difficult task so only undertake the job if you feel absolutely confident in doing so.
If you’re only removing a radiator to paint the wall that lies behind, it might be an idea to consider a ‘radiator roller’. These can be purchased at most major DIY stores and it is quite simply a long handled paint roller to help you get to those ‘hard to reach’ places.
So to start, you will need the following:
• Radiator bleeding key
• Two adjustable wrenches
• Screwdriver
• Plumbers tape (PFTE tape)
• Bucket or bowl
• Old sheets or towels
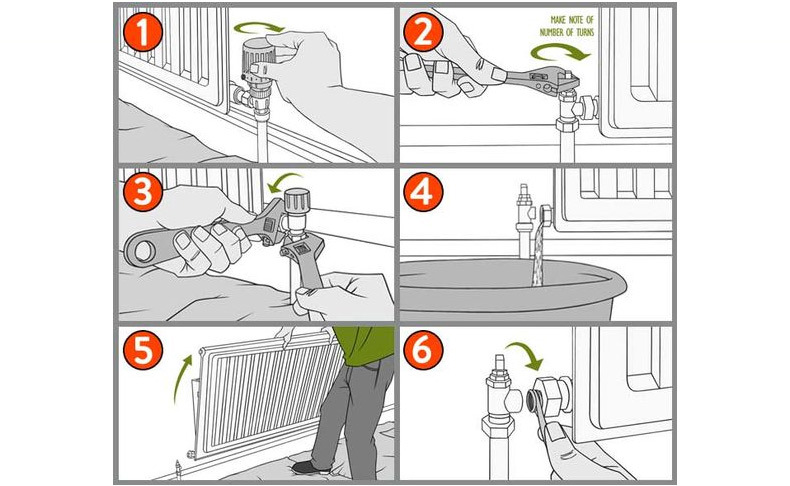
Step 1: Preparing for radiator removal
First and foremost you’ll need to turn off your central heating and allow the radiators in your home to cool down completely. Next, place old sheets or bath towels below the radiator valves at each side of the radiator. Once this has been done, turn the ‘On/Off’ control valve on the radiator to the off position. For thermostatic radiator valves, you’ll need to turn the valve to the frost setting and this is usually shown using a snowflake symbol on the valve.
Step 2: Turning off the lockshield valve
Next you’ll need to move to the other end of the radiator and remove the plastic cap from the lockshield valve and this should expose the brass valve underneath. Turn the square brass valve clockwise as far as it can go using your adjustable wrench. Write down the amount of turns this has taken as, when reinstalling the radiator, you’ll need to reset the turns by the same amount to ensure the flow through the system is still balanced.
Step 3: Loosening the On/Off valve
Place your bucket or bowl underneath the ‘On/Off’ control valve. Use one wrench to steady the body of the valve whilst you use the other to slowly loosen the nut that holds the valve onto the inlet of the radiator.
Step 4: Opening the air vent/bleed valve
Using a radiator bleeding key, you’ll need to open the air vent valve on the radiator and this can usually be found in one of the corners of the radiator itself. By doing this, you will be breaking the vacuum inside the radiator system and water will run out of the control valve and into your bucket.
Step 5: Opening the lockshield valve
Once you’ve drained all of the water from the system, use the same technique to loosen and undo the nut on the lockshield valve. This should allow you to gently lift the radiator from its wall brackets. After this has been done, use the radiator bleeding key to close the bleed valve.
Step 6: Retightening the valves
After you’ve taken the time to decorate around the area (if you are decorating), wrap a small amount of plumbers tape around the screw threads at both ends of the radiator. Then you can replace the radiator back into its original position and retighten both the valves. Retighten the lockshield valve ever so slightly as this point. It’s important to note that you should not over tighten the valve nuts as this can loosen the connections and could cause a serious leak.
Once you’ve finished the above 6 steps, you’ll need to open the control valve and open the bleed valve to allow the water to flow back into the system and fill the radiator. Wait until the radiator has been refilled and then turn the lockshield valve by the amount of turns you wrote down in step 2 to ensure the system is balanced. After this has been done, turn your central heating back on and check for leaks. You may have also let some air into the system at this stage so you might want to bleed the radiator a little after installation.
Please note that this guide is a rough step by step guide. Removing some radiators will require a slightly different method so if you don’t feel confident with the removal, make sure that you hire a plumbing professional to carry out the work for you.